Building a PlexAmp or Logitech Media Server CD Barcode scanner

The original version of this how-to focussed on PlexAmp but I've since switched to using Logitech/Lyrion Media Server. The PlexAmp support remains however the LMS code is better.
As a disclaimer, all the information here is purely offered as guidance and I can't take any responsibility for any damage or problems. That said, feel free to raise an Issue on GitHub or leave a comment if you have a problem, I'd be more than happy to take a look. Similarly, I'm more than happy to receive pull requests!
This is all provided free of charge, but if you find it useful and want to show your appreciation, you can buy me a coffee at the link below - thanks!

Earlier this year, while clearing out my loft, I stumbled upon four boxes filled with old CDs. Among them were old favourites of mine like Band of Horses' beautiful debut album, Melissa Auf Der Maur's fantastic first release, a nostalgia-laden signed copy of Frightened Rabbit's 'Pedestrian Verse', and Desaparecidos' 'Read Music/Speak Spanish', an album I'd almost forgotten but whose lyrics came flooding back the moment I saw it!
There was one problem though, I didn't have a CD player. The usual suggestion is selling the CDs, but I couldn't bring myself to part with the physical copies and let's face it, the majority would be worthless anyway! As a result, I thought it'd be awesome to rip the CDs, then set up a barcode scanner which could scan the CD and play the appropriate album. For me, it's the perfect combination of physically looking through my CD Collection combined with all the convenience of a digital collection. And yes, I admit, it was also a fun project and where's the harm in that?
Before we get started, although the scripts themselves aren't particularly complex, there is quite a lot of configuration which maybe confusing if you've never used some of this stuff before. Ideally, you'll have some familiarity with Python, microcontrollers, possibly docker and be running some kind of home server (even if it's just a Raspberry Pi.) That said, don't let me put you off if you are new to these kinds of projects, they're the best way to learn.

Ripping the CDs
I began by ripping all the CDs into a Plex library. Using a mini PC running Ubuntu Server, I plugged in a USB CD drive and used the excellent abcde tool to rip them. I tried to set up something that would trigger whenever a CD was inserted but I couldn't get it to work. Seeing as this was a temporary task, I wrote a very simple Python script that just keeps trying to rip the CD, eventually ejecting the disc once it's done. Then you just insert the next CD and it continues. Here's the script:
import subprocess
import time

while True:
    try:
        subprocess.run(['abcde', '-N'], check=True)
    except subprocess.CalledProcessError as e:
        pass
    time.sleep(10)
You'll also want to provide a settings file for abcde. I adapted abcde_lossless_flac.conf provided by Andrew Strong: https://www.andrews-corner.org/abcde/ - these are super useful so thanks to Andrew for making them available. You can define your folder structure and other settings in the config file so everything gets ripped to the right place first time.
If you're using Linux like I was, simply rename the .conf file to abcde.conf and place it in /etc/ - whenever you run abcde, it will use the config file as its defaults. For macOS, you'll need to consult their website. I don't believe it's available for Windows, you may need to look into an alternative solution.
Playing the ripped CDs
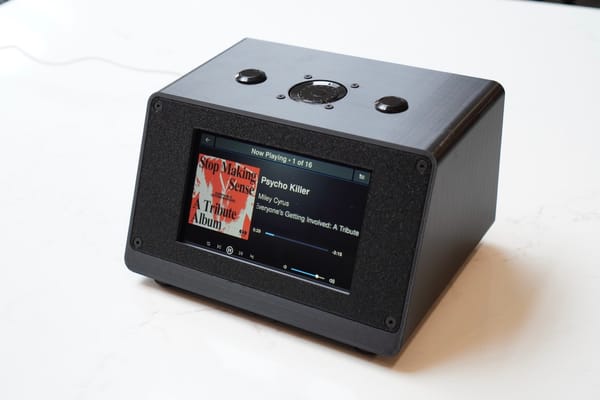
I wanted a way to play the music in a completely headless manner, I didn't want my phone to be an inherent requirement. After a bit of research, I came across the excellent Ropieee project. Ropieee is a Raspberry Pi OS that is primarily designed to be a Roon player, however they have since added in Plex's headless PlexAmp player. I love PlexAmp, it's a really high quality product and I would recommend you use it. Although Plex is free, you do require a Plex Pass membership to use PlexAmp which is ~£4 a month.
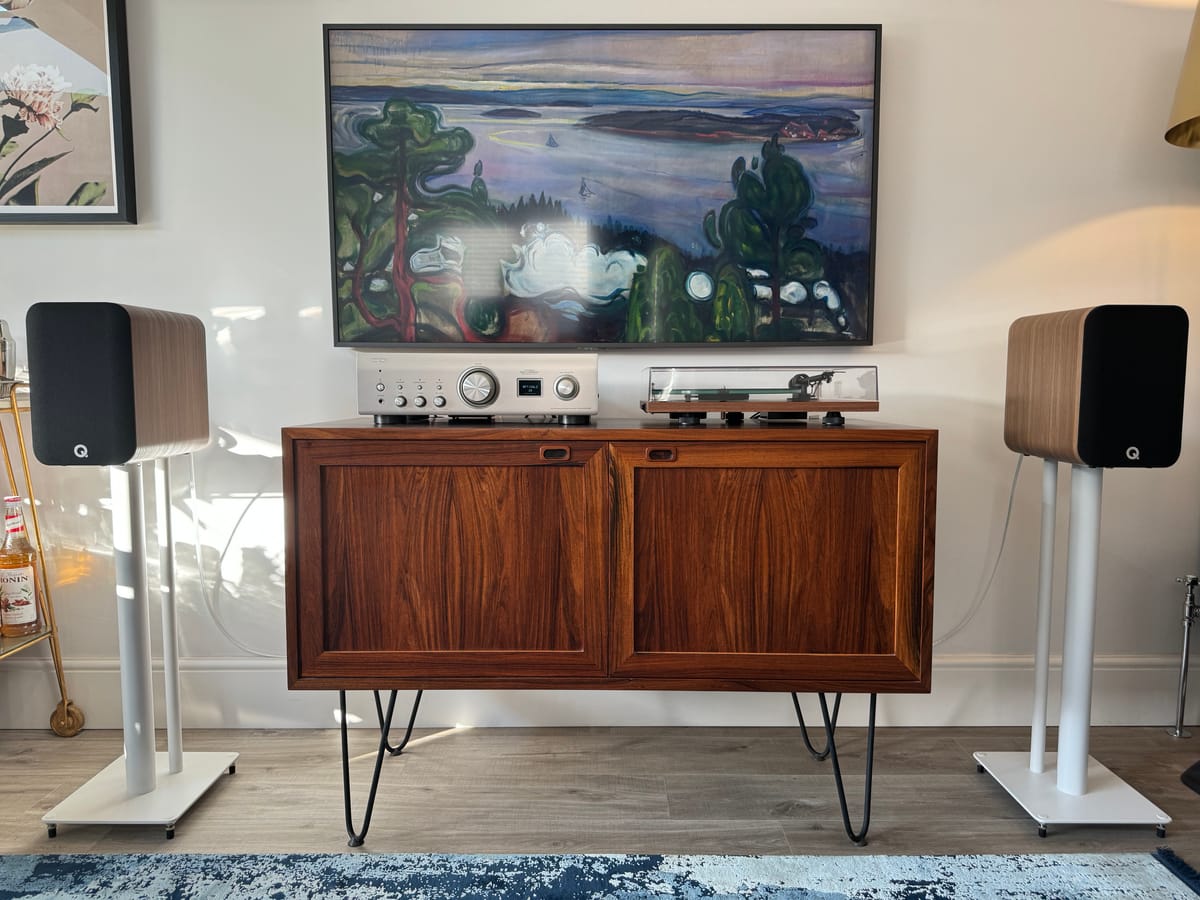
I'm running Ropieee on a 4GB Raspberry Pi 4 combined with the HiFiBerry Digi2 Pro V2.2. The HifiBerry gives the Pi an optical output which is then connected into my Denon amplifier. Within the PlexAmp mobile or desktop app, you can then control the Ropieee PlexAmp server. This also enables the API support I use in the barcode scanner to play the appropriate album when scanned.
The barcode scanner
We now have our library of perfectly ripped CDs, and a PlexAmp player to play them back in bit-perfect lossless audio. Obviously, at this point you can call it a day, throw your CDs back in the loft and pick what you want to listen to from the PlexAmp app, but where's the fun in that?
To build your scanner, you'll need some components:
- Raspberry Pi Pico W (You can get this with and without pre-soldered headers, see below for some thoughts on which to buy) [DigiKey] [The Pi Hut]
- Sparkfun DE2120 Barcode scanner - [DigiKey]
You'll also need to consider some headers and wires. The Pi Pico comes with and without pre-soldered headers but I would recommend getting the one without and soldering them the opposite side (so they’re pointing up). That way, you get a completely flat side of the Pico, making it much easier to mount alongside the scanner in the case. You'll need to do some soldering either way because the Sparkfun does not come with any headers so you may as well do them at the same time. You can see how I did it here:
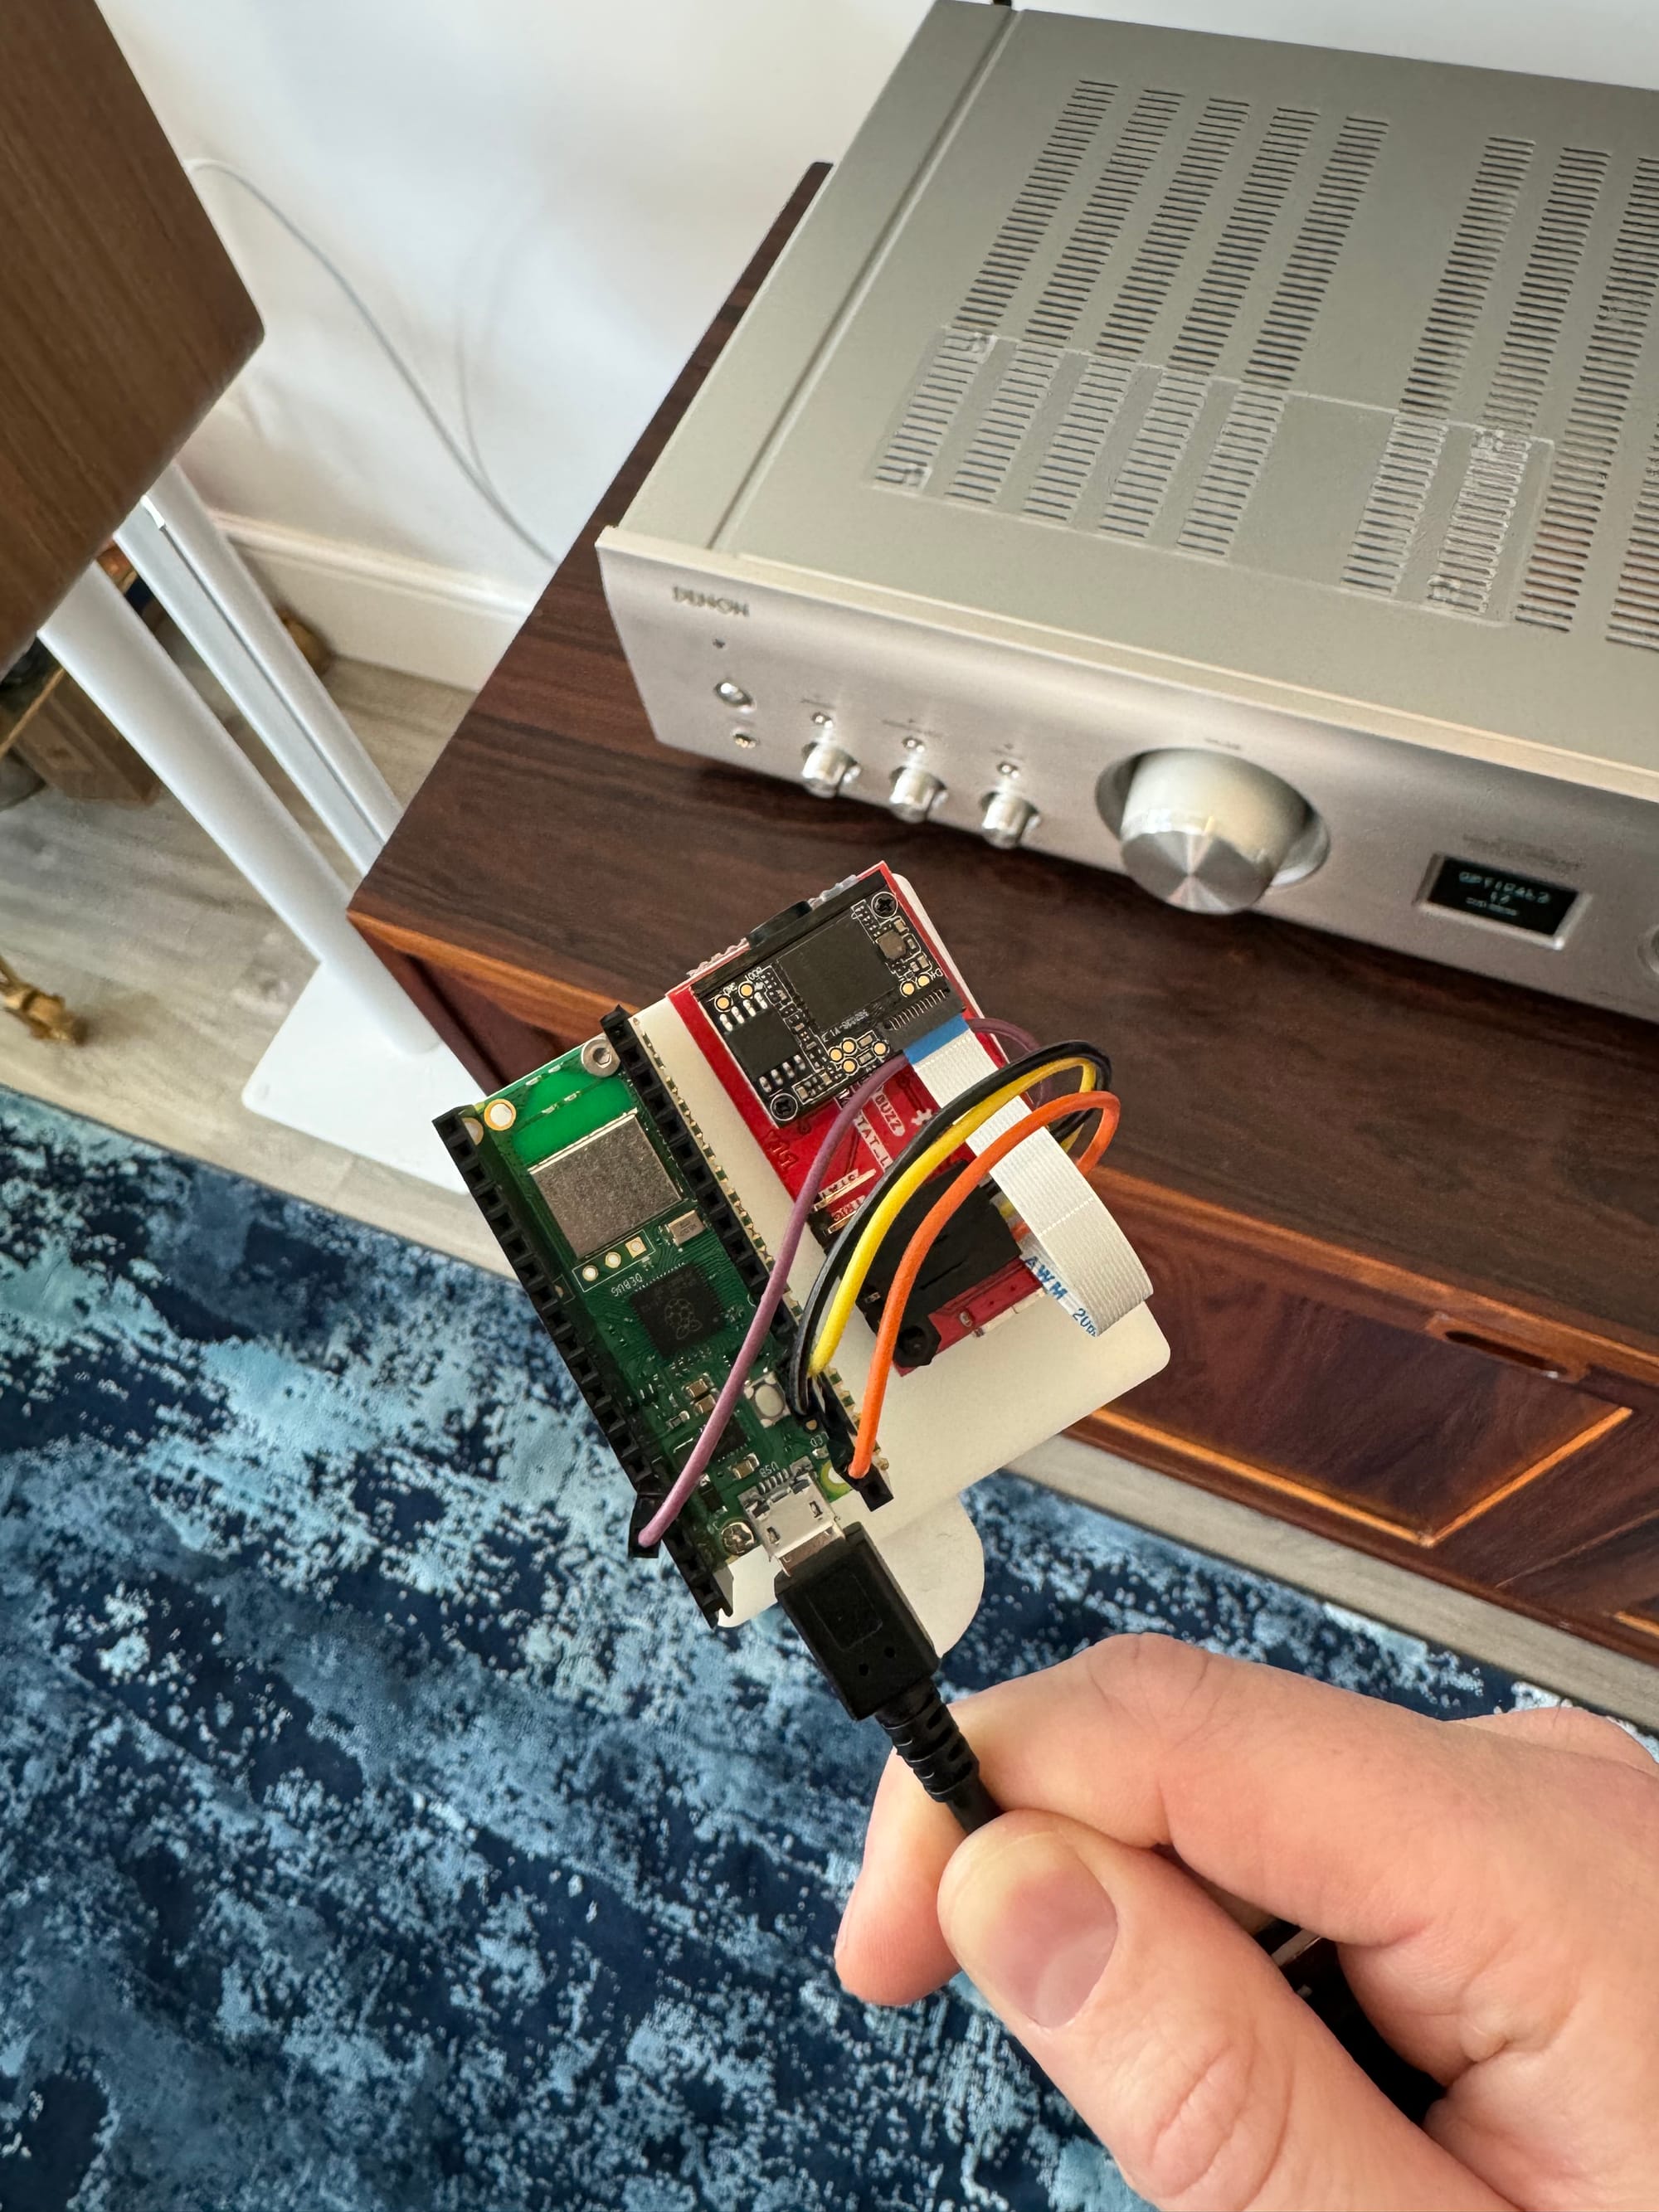
On my Pico, I used these female headers: https://thepihut.com/products/short-socket-headers-for-raspberry-pi-pico-2-x-20-pin-female but only because I had them on hand. You could use male headers then use female to female wires.
On the DE2120 I used some right angled headers but any will do fine. I used right angled as I had originally planned to try and stack the Pico on top of the scanner but it was far easier to just put them side by side.
Of course, you can also directly solder wires from the scanner to the Pico, it just makes it harder to adjust if you make a mistake.
Wiring the scanner to the Pico
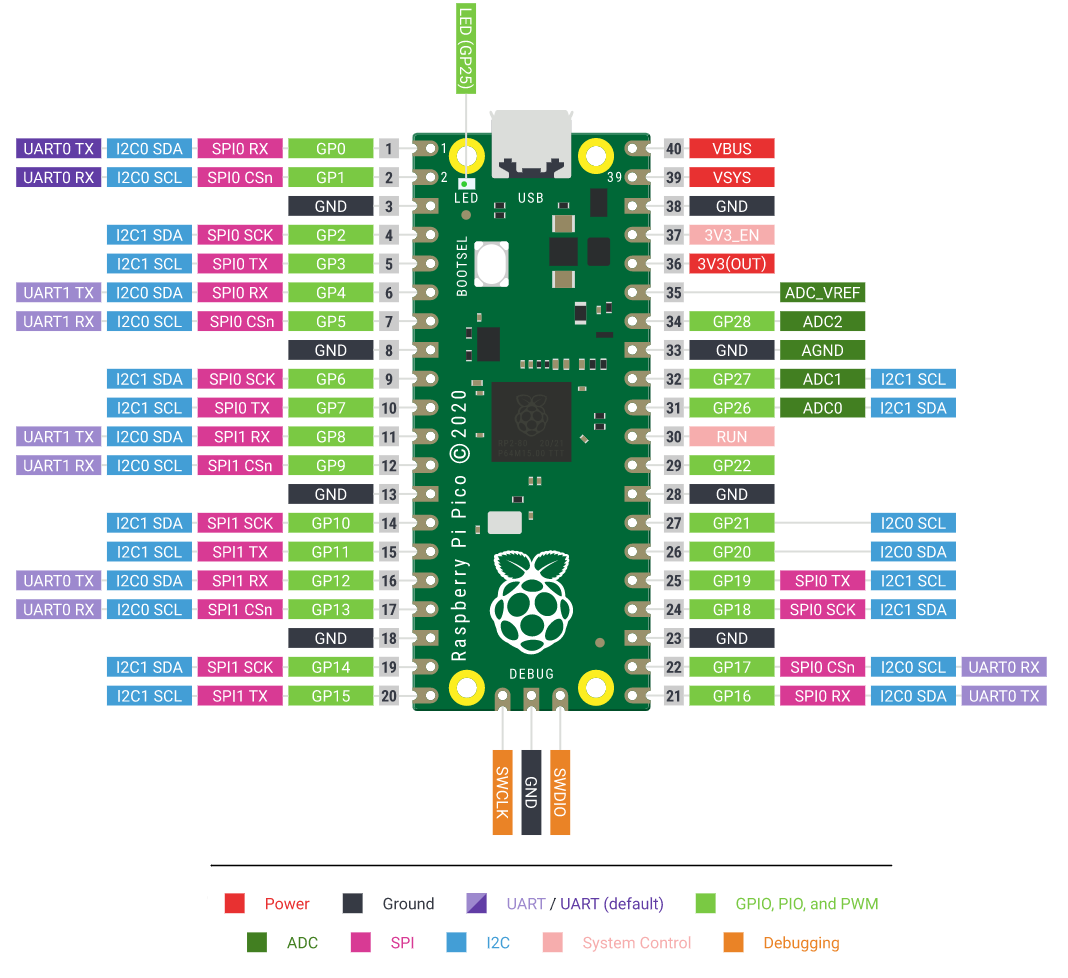
The naming conventions on these microcontrollers can be incredibly confusing but I've done the testing for you so you just need to plug the wires in!
- TX on the DE2120 goes to GP4 on the Pico. That's physical pin 6 counting from the top left
- RX on the DE2120 goes to GP5 on the Pico. That's physical pin 7 counting from the top left
- GND on the DE2120 goes to GND on the Pico. The Pico has multiple GND connections, I used physical pin 3.
- 3.3v on the DE2120 goes to 3V3(OUT) on the Pico. That's physical pin 36. It's the 5th pin down if you count from the top right.
That's it, you're all wired up!
3D Printing the case
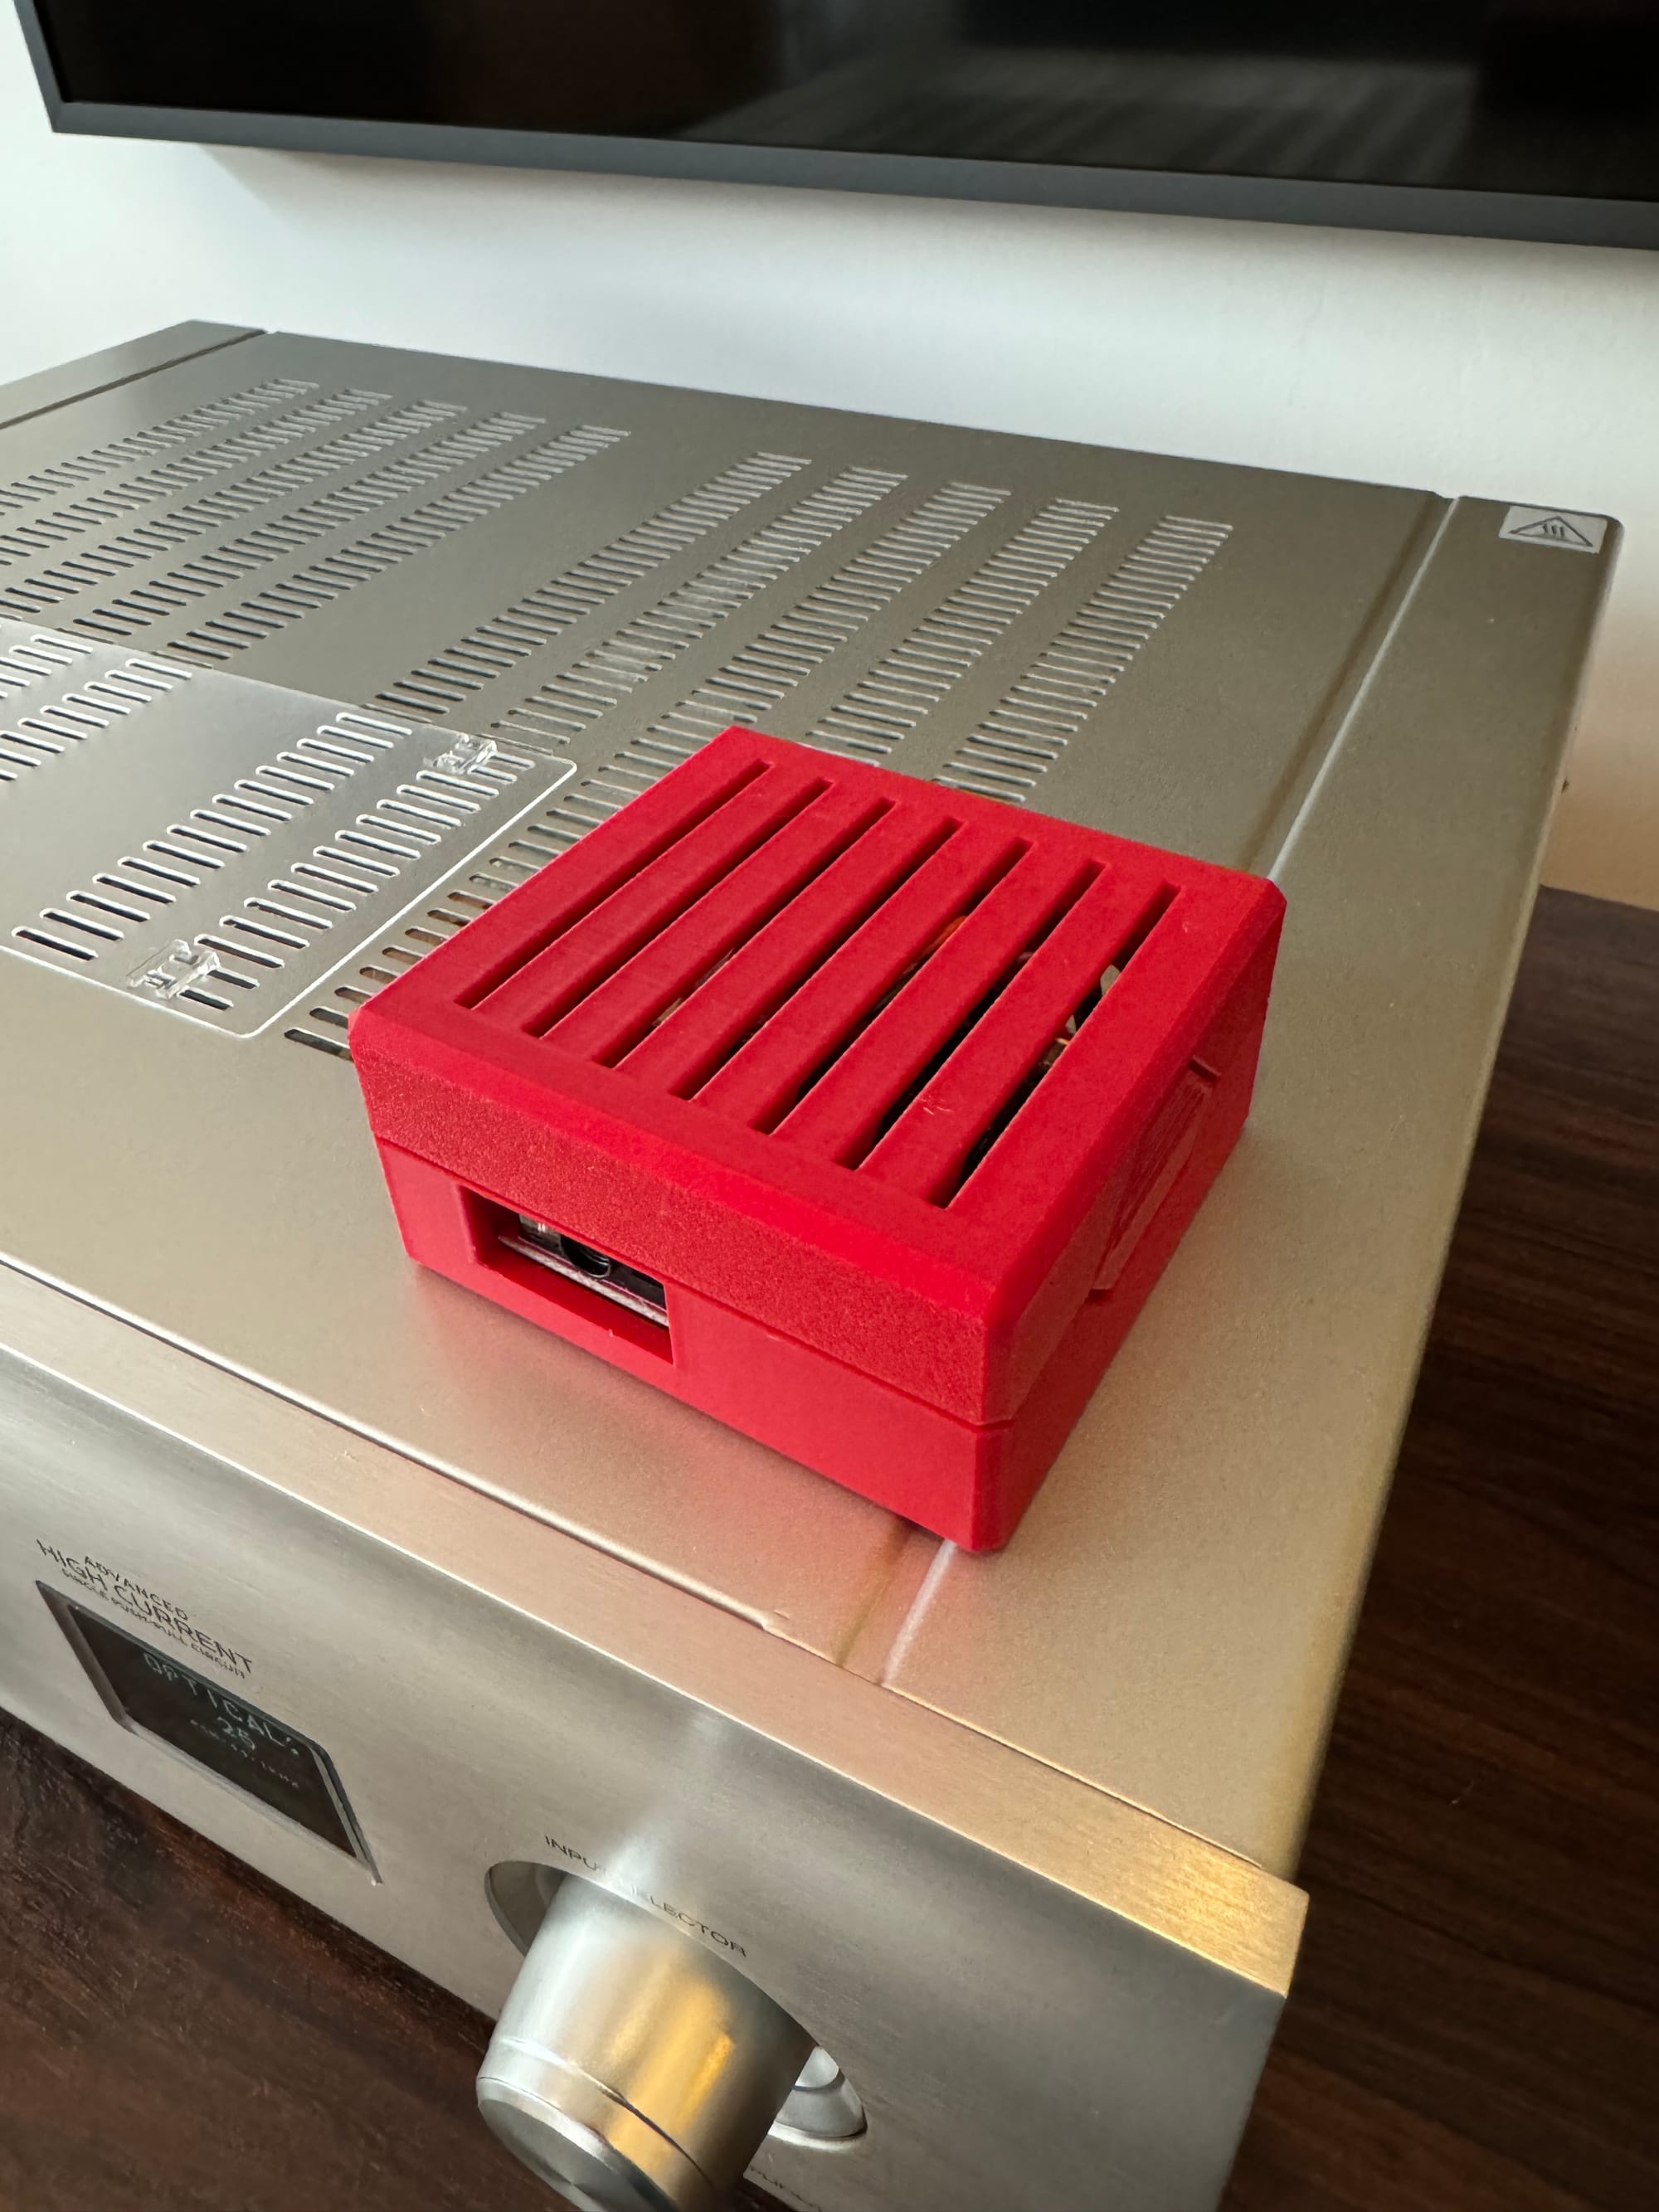
If you have a 3D printer, or know someone who does, I've put together a really sweet little case for the electronics to fit in. Got to give a ton of credit here to Tim Angus who's parametric case was the basis for this - I just added the cutouts for the scanner, USB port and put the standoffs in the right place.
You can download the case from here.
Setting up the scripts
The scanner itself functions as a 'client' and then the main functionality runs on a server. The scanner reads the number from the barcode reader, which is then sent to my home server as an API call to look up the details and play it on Plex. I had looked to run all of this on the Pico however I would need to migrate all the Python libraries to CircuitPython and that's likely a very challenging task (if it's even possible.)
On your home server
We'll set up the server side functionality first as we'll need some details from it to finish setting up the Pico. If you don't already have a home server, this could be a great opportunity to set one up! A Raspberry Pi would be more than sufficient for this, or you could get a Mini PC - Beelink and Minisforum make some great options.
Of course, you can also set this up on any other computer you may own, just keep in mind it will need to be on for the whole set up to work.
Configuring the server in Docker
Using Docker may seem like overkill, however, it handles some key aspects of the server such as restarting it on boot or if there's a problem, and it also makes it much easier for me to distribute it to you in a working format.
If you already use Docker and Docker Compose, you can review the provideddocker-compose.ymland merge it into your own config, you'll just want to drop thecd-scannerfolder into the same folder as yourdocker-compose.yml. Check out steps 6 and 8, too.
If you're new to Docker, follow these steps:
- If you aren't already using Docker, install it on the machine you want to use as your server.
- Create a folder on that same computer where you'll store your docker configurations - pick somewhere it won't be deleted or moved
- If you're comfortable with Git, clone my repo. Otherwise, download the zip file and extract it somewhere familiar
- From the Github repo copy over the folder called "Docker"
- Open up
docker-compose.ymland review theenvironmentsection. There's quite a lot here so let's work through it:DISCOGS_CONSUMER_KEY,DISCOGS_CONSUMER_KEYandDISCOGS_APP_NAME- This is obtained from the Discogs developer website:
- Go to https://www.discogs.com/settings/developers
- Create an account
- Click 'Create an application'
- Give it a name (whatever you want) and click create.
- Discogs will then show a new page and at the top if your consumer key, consumer secret and Application name.
- This is obtained from the Discogs developer website:
PLEX_DOMAINis the IP or domain of your plex server. Don't use a trailing slash and don't forget the port if you're using an IP address. Example:http://192.168.1.4:32400PLEX_TOKENcan be obtained by following the guidance herePLEX_CLIENTis the name of the Plex player you want to play the music on when a scan is made. If you're using Ropieee, this is whatever you named PlexAmp in the Services menu. In my case it was "Kitchen HiFi"PLEX_SECTION- Within the code, I initially search the entire library for the full name of the album (<artist> - <album>) however if that doesn't work, I perform a search of the specific music library and try to filter down for the requested album. That's what this specifies - in almost all cases, it will just be 'Music'HASS_DOMAIN,HASS_SCENEandHASS_TOKEN- Ignore these for now. I am using Home Assistant to power on my amp and set it to the correct input when a CD is scanned. There's additional configuration required and it's unlikely we have the same equipment.
MUSICBRAINZ_EMAILandMUSICBRAINZ_APP_NAME- Discogs is the primary place I search for barcodes but Musicbrainz is used as a backup. They don't utilise API tokens and instead ask that you provide an app name and your email address. The app name can be anything you like, just avoid spaces and special characters, e.g.
PlexAmpCDScanner
- Discogs is the primary place I search for barcodes but Musicbrainz is used as a backup. They don't utilise API tokens and instead ask that you provide an app name and your email address. The app name can be anything you like, just avoid spaces and special characters, e.g.
LMS_PLAYER- If you're using LMS instead of Plex, this is the MAC address of the player you want to use
LMS_URL- This is the URL for your LMS server. It needs to look like this: "http://192.168.1.4:9010/jsonrpc.js"
Structure:<IP/Domain>:<Port>/jsonrpc.js
- This is the URL for your LMS server. It needs to look like this: "http://192.168.1.4:9010/jsonrpc.js"
- Open a terminal and change to the
Dockerdirectory. If you aren't sure how to do this:- If on Windows search for "PowerShell"
- For macOS, use Spotlight to search for "Terminal"
- In Powershell/Terminal, type
cd, press the space bar once then drag the docker folder into the Powershell/Terminal window. The full path should automatically get filled out. Press enter.
- Run these commands:
docker compose build cd-scannerdocker compose up -d cd-scanner
- It may take a minute to all start up, once it finishes we can test it out. You'll need the IP address of whatever machine you've set the server up on, then run:
curl --location 'http://192.168.1.4:5000/5030094136526'replacing192.168.1.4with your own IP address. If you aren't sure how to find your IP, try this. Make a note of your IP address, we'll need it later! - Hopefully, you'll see this:
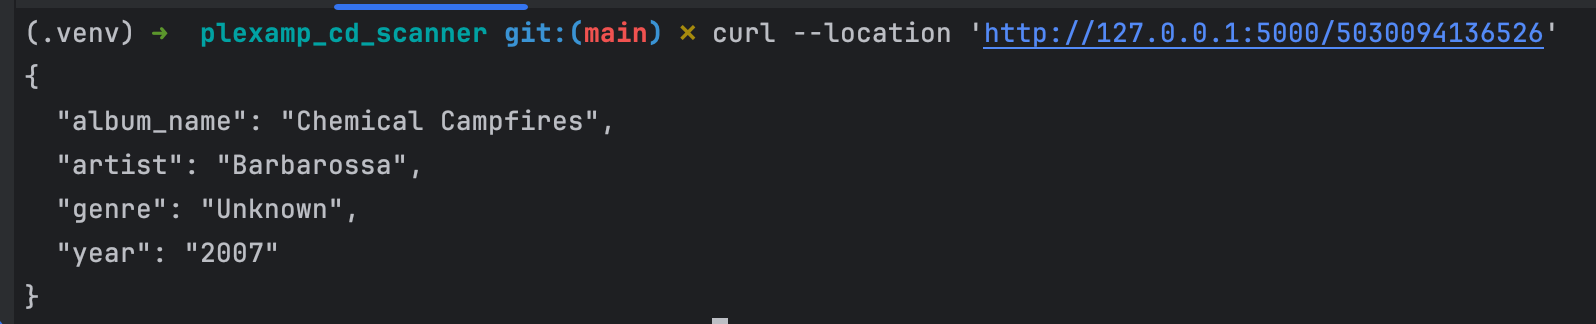
- Try replacing the barcode (
5030094136526) with the barcode of an album you know to be in your library and re-run the command, confirming it plays back successfully - If you get any errors, double check the environment variables you set in your
docker-compose.ymlfile. If you spot a mistake in the compose file, fix it then re-rundocker compose up -d cd-scannerto apply your changes. - You can also run
docker logs cd-scannerto view the logs from the container which may help point you in the right direction.
On the Pico
The Pico needs flashing with CircuitPython as a first step, and you'll want to set up WiFi.
- To install CircuitPython, follow the guidance here
- Once that's done, look at the CIRCUITPY volume mounted on your computer. Edit
settings.tomland add this :
CIRCUITPY_WIFI_SSID = "your_wifi_ssid"
CIRCUITPY_WIFI_PASSWORD = "your_wifi_password"
CIRCUITPY_WEB_API_PORT = 80
CIRCUITPY_WEB_API_PASSWORD = "passw0rd"CIRCUITPY_WEB_API_PASSWORDcan be whatever you want, you'll use it to acccess your Pico from your browser.CIRCUITPY_WEB_API_PORTcan be left as 80 unless you've got a reason to change it, and WiFi SSID and password should be whatever your WiFi details are.- Open the
circuitpythonfolder from the previously cloned repo and replace the IP address on line 25 with the IP we spoke about in the previous steps. - Drag and drop/copy and paste the entire contents of the folder
circuitpythononto your CIRCUITPY drive. Remember you only want the contents of the folder, not the folder itself. If you're prompted to replace files, say yes. - Eject (macOS)/Safely Remove (Windows) the CIRCUITPY drive and reboot the Pico (just disconnect and reconnect) and give it a few seconds to boot up.
- That's it! Scan a CD and see what happens...
Troubleshooting
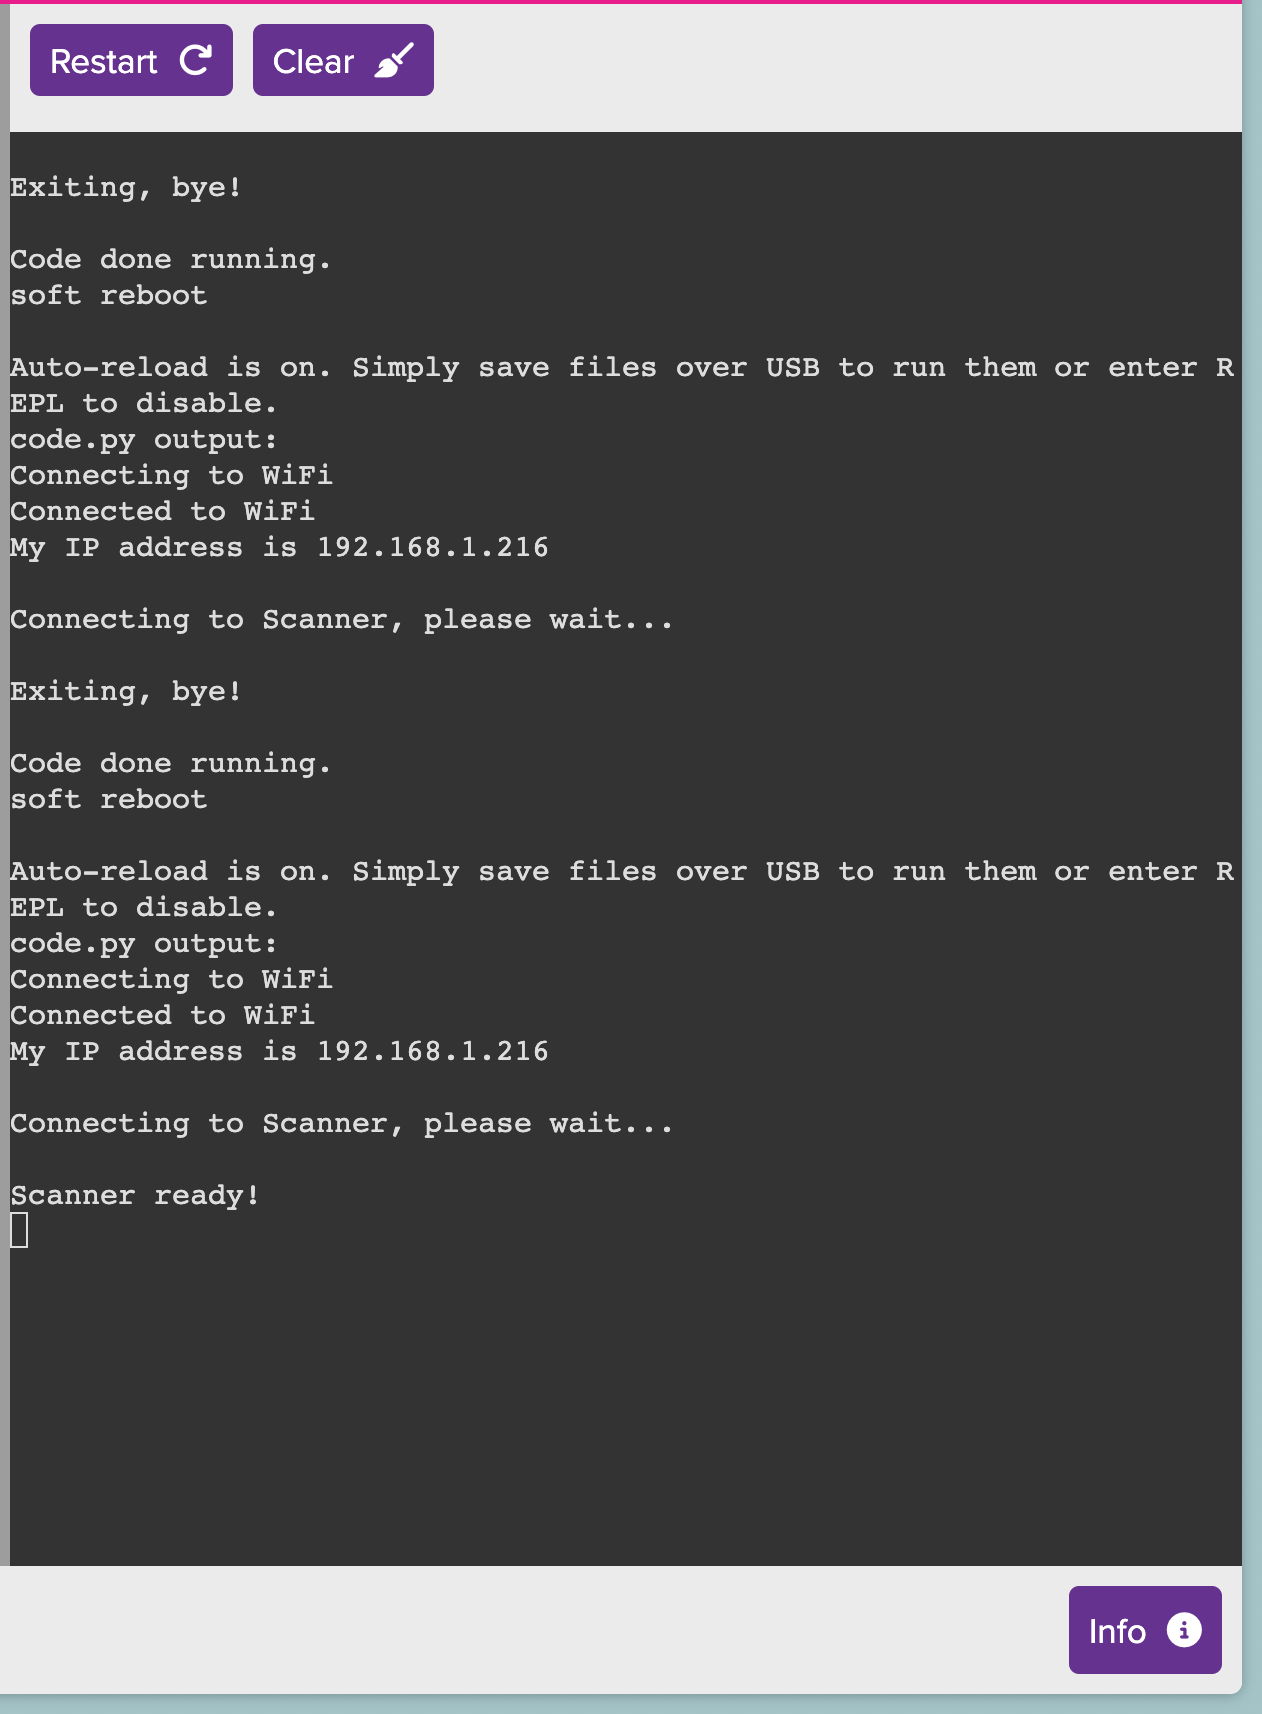
- Adafruit make a web-based code editor available which is a really convenient way to test if everything is working. If you're lucky, this will work: http://circuitpython.local/code/
- However, I've had mixed success with these .local domains. If it doesn't work for you, you'll need to find out the IP address of your Pico first (most likely by logging into your WiFi router), then visit it like this: https://192.168.1.216/code/ (obviously change the IP to match your Pico.)
- Once you're in, click Serial at the bottom, then click into the right hand panel. On your keyboard, tap CTRL+C and CTRL+D a couple times until you see some output. I never really understood what actually gets it going but this works so there you go. You'll hopefully see something like this:
- If you see "The Barcode Scanner module isn't connected correctly to the system. Please check wiring" then check your wiring. In particular, double check that TX on Pi side goes to RX DE2120 side - it's intentional that they don't match (e.g. TX on the Pico should not go to TX on the scanner)